How to Save Your Flowering Bulbs from the Holidays for Repotting and Reblooming

Planted bulbs like amaryllis and paperwhites are popular holiday gifts. With a bit of care and planning, you can encourage your gifts to grow back year after year for gorgeous holiday color. When you repot bulbs and grow them through the year, allowing the leaves to photosynthesize, you will charge up your bulb to produce brilliant blooms again.
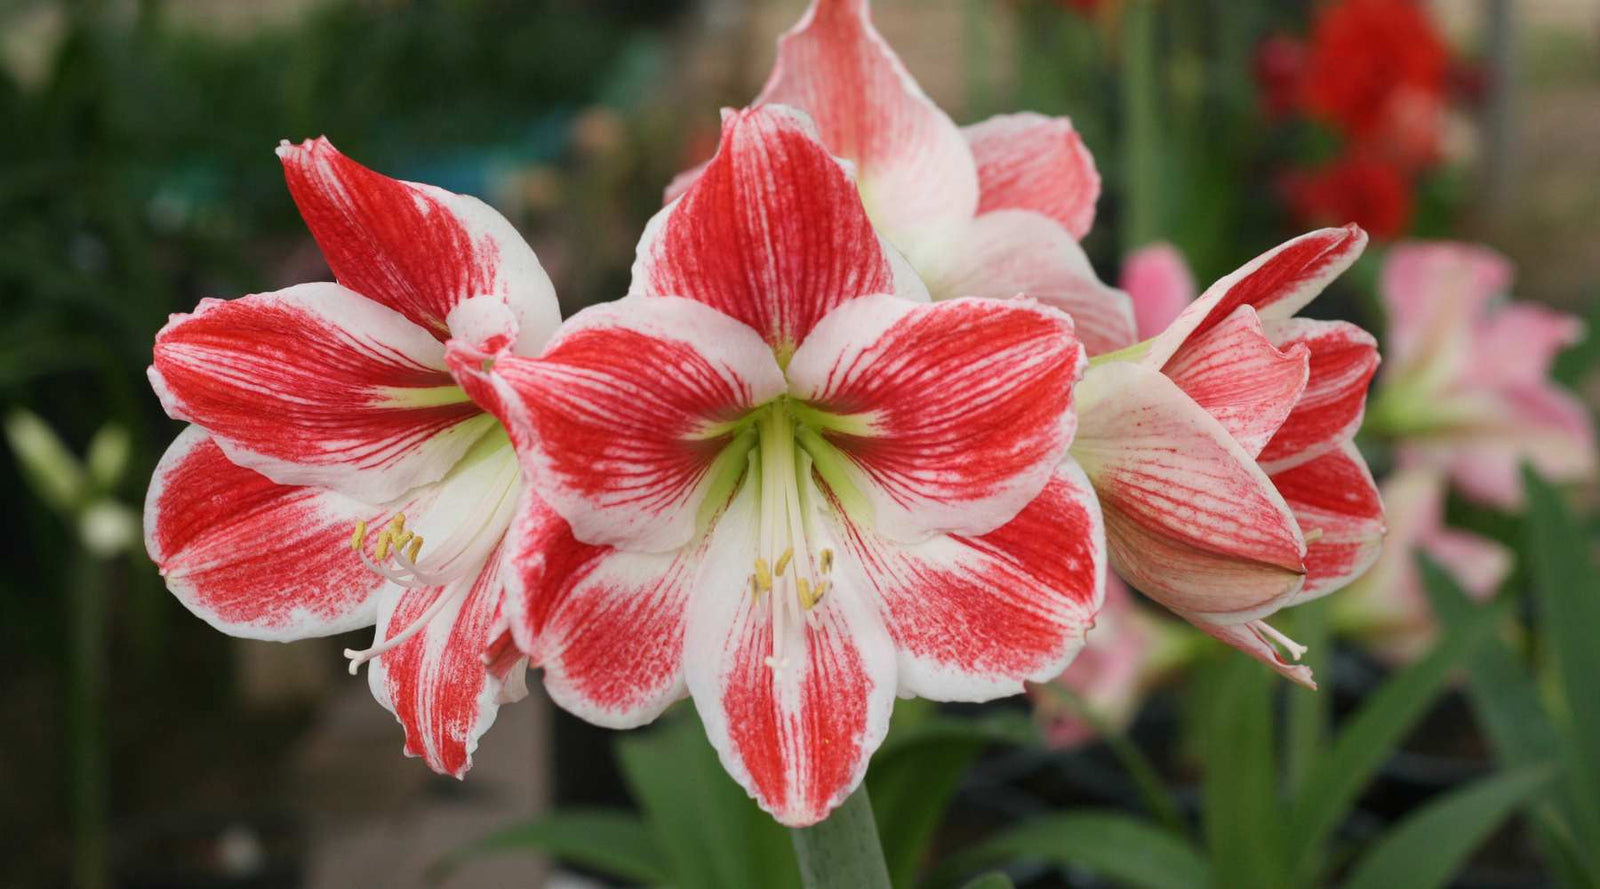
Properly cared for amaryllis bulbs will flower every year. Paperwhite bulbs planted indoors or outside will typically only flower every 2-3 years. Often when planted in large groups, some will flower each year while the others provide supporting foliage.
Throughout this article, when we are talking about amaryllis, we are referring to the popular genus Hippeastrum of the Amaryllidaceae family. Paperwhites are a member of the Narcissus genus, N. papyraceus, that do not require chilling to bloom.
Are amaryllis perennial or annual?
Amaryllis are perennial when cared for properly. When you repot amaryllis bulbs as they grow you encourage the perennial nature. Many people do choose to grow amaryllis as an annual but it seems a shame to us to not get the most from your investment in bulbs. There are definitely gardeners out there that are still growing bulbs they inherited from their grandmothers.
Do paperwhites rebloom?
Paperwhites are biennial in their flowering. This is why they are typically planted in groups. Some bulbs will flower every other year while others will flower every three years. So do not despair if you don’t see blooms after one year.
How to Repot Flowering Bulbs in Containers
Repotting your bulbs carefully gives you the best start for beautiful flowering shows in the coming years. The process here focuses on planting bulbs in small pots but many of these steps can also be used to successfully plant your amaryllis and paperwhite bulbs in containers outdoors if they are hardy in your growing zone.
Particularly if you want to grow outdoors, grow bags can make great containers for bulbs as they have excellent drainage. Grow bags are easier to move than traditional terracotta and make transplanting out into display pots easier. For more on the growing advantages of grow bags you can check out this article.
Step 1: What to do After Bulbs Finish Blooming Indoors
Once your bulbs have finished blooming you can prepare them for repotting. While you can plant them outdoors in the garden if your growing zone is 8 or above, in other growing zones they are typically grown as houseplants for most of the year. Neither amaryllis nor paperwhites can tolerate hard frosts.
Once the blooms have faded, cut the flowering stems off about an inch above the bulb. Carefully pull the bulbs from their pot and remove as much growing media from the roots as you can easily without damaging them. If there are any dried out or rotted looking roots, trim them away. This is also a good time to remove any yellowed leaves.

Step 2: Choose the Right Pot and Soil
The best containers for planting bulbs must have a few defining characteristics. Unlike display pots used for the flowering phase of forced blooms, the goal here is ideal growth and not presentation. This means your pot should have very good drainage as bulbs are susceptible to rot issues if they are allowed to sit in water. It also means you will need a saucer under your pots to catch run off. Our 5 inch pots work great for bulbs. The shallow 5x5 growing tray makes an excellent saucer.
For single amaryllis bulbs the pot should be of a size that the bulbs will be a bit crowded, this means that a narrow and deeper pot is better. These 5 inch pots are great for bulbs up to 38 centimeters. The pot that you choose should be around 6 inches deep to give the roots space to grow.
For paperwhites a 6 inch deep pot will allow you to get the right planting depth for strong growth. Container bulbs can be planted closer together than those in the garden. As they are small you can fit four or five bulbs together in a 5 to 6 inch pot.
Soil for bulb planted should likewise allow for good drainage. Traditional potting soil typically has good drainage but you can amend it to increase the drainage. For more on creating your own soil mixes and definitions of common ingredients you can check out our article on Growing Media for Microgreens. There are premade bulb mixes available at most garden supply stores that are specially designed for growing bulbs and typically contain their own fertilizer.
Step 3: Choose a Fertilizer
Bulbs do need food during their growing season. Remember that this growth phase is when your bulb is charging its battery for its next flowering show. For planting outdoors or in your favorite potting mix, choose a bulb specific fertilizer or a balanced one like a 10-10-10.
For growing bulbs indoors in particular you can get a bulb mix that is designed with slow release fertilizers and holds less water than traditional blends. Bulbs do need good drainage to prevent rot.
Step 4: Bulb Planting Depth
Planting depth for bulbs is very different for amaryllis and paperwhites when planting for leaf and bulb growth.
For amaryllis the top third to of the bulb should be completely above the soil line.
For paperwhites you will plant them much deeper. 3-5 inches deep is ideal as the bulbs should be planted with the base around 3 times as deep as the height of the bulb. This means a one and a half inch tall bulb would be buried with the base sitting 4.5 inches below the soil line.
Step 5: Plant and Water Your Bulbs
- Start with clean pots and premoistened potting soil or growing medium.
- Lay down a layer of soil in the bottom of your pot deep enough to set your bulbs at the proper height.
- Sprinkle in your fertilizer if you are using it and mix it with the base soil.
- Place each of your bulbs into the soil pointy end up. Work long roots down into the soil gently to keep the bulb at the proper height.
- Back fill the pot with more of your growing media to cover the bulbs to the desired depth as outlined above.
- Water in your bulbs enough to thoroughly moisten the entire pot. Be careful to water around the bulbs as much as possible and not onto the amaryllis bulb itself.
- Set them in a bright spot to allow the leaves to grow and photosynthesize as much as possible. Do not put them out doors until after your last frost date.

Picture Credit: www.theeverhopefulgardener.com
Step 6: Select where to grow your bulbs throughout the year
While you can grow bulbs indoors year round, they need a lot of sun to store energy through their leaf growing phase. So if you can find space for them outdoors in the spring and summer you may find that you get better bulb growth. If you are using our 5 inch pots and have a number of bulbs to put out you can use a 1020 deep tray and the pots with tray insert to hold them steady and make transport easy.
If you will be keeping your bulbs indoors as flowering houseplants, you will need to give consideration to their preferred growing environment. Amaryllis prefer warm temperatures and bright light. Next to a heater vent or a south facing window sill is perfect.
Paperwhites are a cooler weather plant and prefer temperatures a bit lower. They still need plenty of light to grow. An unheated sunroom or the window sill of a cooler room is great.
How much sun do my bulbs need?
Bulbs need full sun to grow well during their foliage growth stage. This means at least 6 hours of sun. Ideally this would be morning sun and allow your bulbs a rest from the hottest part of the afternoon.
How much water do my bulbs need?
Bulbs do not like to be over-watered. Water regularly but judiciously, keeping soil moist but not soggy. You will need to keep an eye on the heat and humidity in your area to inform your watering. Remember that bulbs will rot if over watered. Having them in easy to move pots will also be helpful if you live in an area that gets heavy rains so you can move them under cover.

Picture Credit: www.theeverhopefulgardener.com
When to bring bulbs in to force dormancy.
The timing of when to bring bulbs in can be dependent on a large number of factors. Growing zones, frost dates, annual weather changes, desired bloom time, the need for chilling, and available space will all influence your timing. Generally sometime in August or September is the time to start thinking about chilling and encouraging dormancy.
Tips for bringing bulbs out of dormancy.
Place bulbs in a shallow container of water in a warm spot overnight. No more than a ¼ inch of water. This allows the roots to soften and begins the process of convincing the bulb that the weather has turned and it is time to start blooming.
One good deep water of tepid or warm water and place in a spot for ideal temperature as listed below.
Tricks for growing and forcing amaryllis bulbs indoors
- When you repot amaryllis they should always have the shoulder of the bulb ⅓ to ½ way above soil.
- Use moss, pebbles or small pine cones to cover soil once it’s in the final planter.
- Amaryllis need 6-8 weeks of dormancy in order to bloom. This means if you want them to bloom for the early winter holidays, you will need to bring them into a cool dark place starting in late August or early September.
- It will take 5-8 weeks for your planted amaryllis to begin blooming.
- Keep your flowers from leaning. If the light in the room is not directly above the plant. Turn the pot a quarter turn every day to keep the stalks straight.
Tricks for growing and forcing paperwhites indoors
- Select paperwhites based on your feelings about the scent. The scent of paperwhites is definitely a personal opinion, to some it is beautifully floral to others it has hints of cat pee. Nir has almost no smell and Inbal has a faint version of the stronger traditional scent of the classic Zeba variety.
- Dormant bulbs take only about 3-4 weeks to begin blooming.
- Once you have planted your bulbs from their growing pots into the pots you wish them to bloom in, place them in a cool, dark place for one to two weeks to encourage strong root growth. This will help keep your paperwhites from falling over once the flowers become top heavy. This is true with purchased bulbs as well.
- If you are growing in pebbles with water, the water should not touch the bottom of the bulb. Keeping the water below the basal plate of the bulb will prevent rot.
- If using paperwhites as cut flowers with other blooms and stems, remember to let the toxic sap drain out for an hour or so before using them in arrangements.