How To Grow Microgreens Indoors - SEED to HARVEST

The steps you need to grow the perfect tray of microgreens
Hey, Donny Greens here! If you’re interested in growing microgreens indoors, I think that’s a really great idea. Growing microgreens at home is one of the most empowering things you can do for yourself or your community.
When I started my farm in 2016, I made a lot of mistakes, and I ran a lot of experiments. Through all my trials and tribulations, I’ve learned the best techniques to help you grow a perfect tray of microgreens from seed all the way to harvest.
Whether you're just starting out or looking to refine your skills, this step-by-step guide will empower you to grow perfect trays of microgreens right at home.

Step 1: Prep Work
Tray Sets: Creating the Foundation
Creating the foundation for a great tray of microgreens literally starts at the foundation - the tray. I only use Bootstrap Farmer shallow 10x20 Trays. I highly recommend starting with high-quality equipment.
You want to buy high-quality equipment that will last you forever the first time rather than low-quality equipment that will break, causing you to purchase over and over again. Investing in your equipment will save you money in the long run, and the Bootstrap Farmer trays are super sturdy, made in the USA, and the best on the market.
Once you have your trays, you can create your “tray set.” These two trays stacked together will enable you to water your microgreens properly. You will need a tray without holes and a tray with holes. Start with the solid tray without holes, which will be the bottom tray in your set. Then place a tray with holes inside and you have successfully created your tray set!
The bottom tray doesn’t have holes, so it will catch your water and prevent it from spilling out. The top tray, which is the tray with holes, will allow for drainage of excess water and also absorption of water when “bottom watering,” but more on that later. This foundational setup ensures proper drainage while retaining essential moisture.
Choosing the Right Growing Medium
The ideal growing medium promotes optimal microgreens development. It should hold enough water for the plants to utilize as they need but have enough drainage that the roots will still have oxygen, preventing an anaerobic environment, which can cause problems. I recommend using a high-quality potting mix that is based in perlite and peat moss. I like to use ProMix, but experiment to find what’s right for you.
You can also use a grow mat like the hemp grow mats found here. These are a bit cleaner for growing in the home, but the crops will take longer to grow, watering is slightly more difficult, and your crops will typically be the highest quality when using a potting mix.
You can use online retailers or find growing mediums locally at greenhouse supply companies and nurseries. They may even be able to special-order if you want something specific. The right growing medium will help keep your trays healthy and ensure soil drainage is optimized.
Seed Selection and Preparation
What type of microgreen variety will you decide to grow? China Rose Radish? Black Oil Sunflower? The variety of microgreens you are growing will affect your seed preparation. Some seeds like sunflowers and peas should be pre-soaked before making your tray to take in as much water as possible, ensuring a solid germination. Smaller seeds like radish and broccoli are smaller and will be able to absorb enough water directly from the growing medium.
The amount of seeds you use per tray is also an important factor and varies from variety to variety. Too many seeds can cause problems like mold, wet crops, and smaller leaves. To few seeds and your yield won’t be so great.
Use the Ultimate Microgreens Cheat Sheet to learn proper seeding rates and soak times for the variety you want to grow. These factors will affect the overall growth of your microgreens, so make sure you understand your seed varieties!

Step 2: Tray Making
Now that you have your tray set ready and have decided on your seeds to grow, it’s time for my personal favorite farm task - tray making!
I broke it down into some simple steps below:
- Set out your tray sets - however many you need. I make no more than six trays at one time.
- Fill and spread out your growing medium evenly into your trays.
- Flatten the growing medium by pressing with soil tamper or even another (clean) tray set.
- Broadcast your seeds - I use a pint-size Chinese food container.
- Press again to achieve improved contact between the seeds and growing medium.
- Give your tray a hefty top watering with a shower-style spray but don’t overwater. They should have just enough to last them through the germination process.
- Stack your trays, add a weight on top, and move them to your germination area.

Step 3: Germination
Tray Stacking and Weighting
Tray stacking and adding weight are two of the ways to create the perfect germination environment. I stack anywhere from one to six trays per group. Each tray stack is topped with a no-holes tray and a 14-pound paving stone.
By stacking your trays, you mimic the conditions of being planted into the ground. The darkness, moisture retention, and seed resistance are optimized through this method. By stacking your trays and adding weight, you are giving your seeds what they need to sprout and root effectively, giving them something to push up against to get their roots into the growing medium.
Monitoring Germination Progress
As the days pass, you will observe the exciting development of your microgreens pushing up on the trays above. But do not peek, just leave them be! The more you intervene, the more opportunity for diseases or disaster. Each time you lift the trays, its a new opportunity for new mold spores to enter the environment. Additionally, you can damage the crops because all the weight will shift to the back side as they are at their most fragile growth stage.
I know its tempting, but the best thing for you to do is observe from afar. Don’t lift the trays or peek inside - just leave them be!
When you see the trays start pushing up, like the image above, this is how you know when the germination phase is ending, marking the transition to the next stage of growth for your microgreens trays. Just be careful not to let them germinate too long or they might topple over!

Step 4: Transition to Growth Under Grow Lights
Introducing Grow Lights
Transition your trays from germination to the growth phase by placing your trays under specialized grow lights. I typically use only one T5 light per shelf on my racks for most microgreen varieties, although I do use two for some. Experiment with the number of lights per shelf and your light schedule so you can dial in your farm and learn what works bets for you and your crops.
I’ve been running a light schedule of 12 hours on and 12 hours off, having the lights on during the night and off during the day to improve the efficiency of my farm since my fluorescent lights give off some heat. Each farm will be different, though, so find what works best for you and your greens.
Daily Watering Routine
The first watering after going under lights is one of the most important. After a few days with no additional water (because we don’t touch our trays when they are in germination), your trays need a good watering. Ensure you give them enough water, but not too much, right when they go under lights.
This is typically the only time I will TOP water during the growing phase, but if you’re growing something like sunflower, you can top water for a few days to help remove those seed hulls. As your microgreens develop a canopy, you definitely want to be bottom watering because a wet canopy can damage your greens and make them more prone to disease and rot.
Establishing a consistent daily watering routine for your microgreens is essential. I recommend watering once daily in the morning, but you can adjust your watering practices for your farm and your life. These daily waterings are done by adding water between the trays of your tray set. The water will sit in the bottom tray that doesn’t have holes and absorb upwards into the growing medium so your plants have access.
Make sure you are honing into the tray’s weight, visual cues of dehydration/overwatering, and the soil color so you can properly water each tray as your microgreens mature. Each tray may be different because of location in the farm and human inconsistencies. One might need more than another, so don’t assume that each tray will be watered the same!

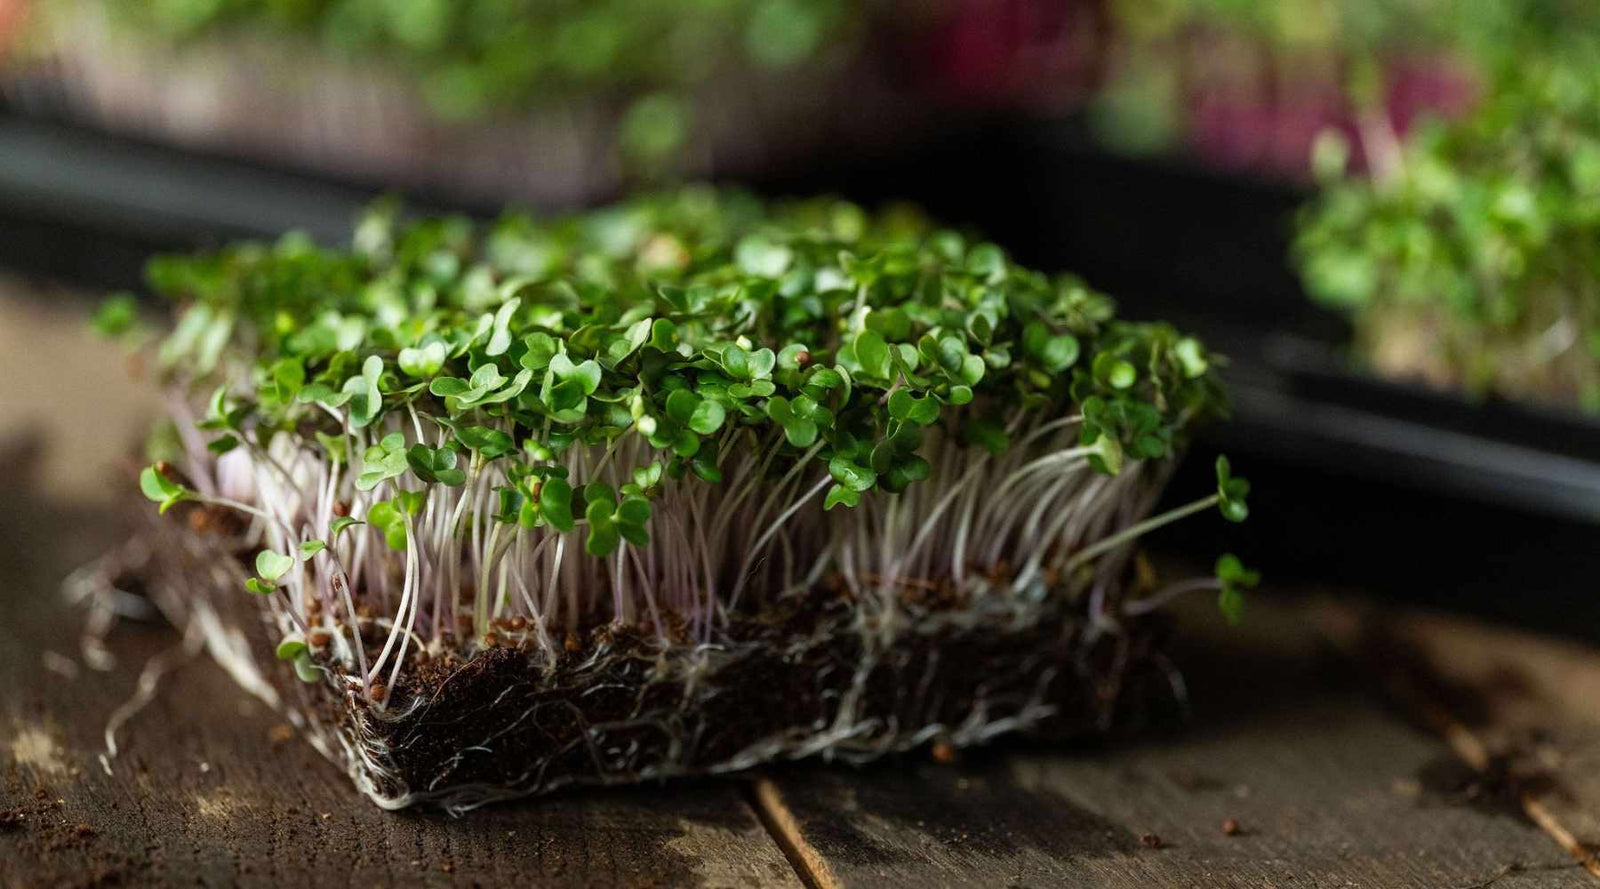
Step 5: Harvesting and Enjoying the Fruits (Greens) of Your Labor
Determining Maturity
After about a week, start to assess the maturity of your microgreens. Learn to understand the cues that indicate they are ready for harvest. Each variety will be different and require a different growth schedule. You may also want to grow out the second set of leaves (true leaves) on some varieties. Doing this with other varieties, like sunflowers (pictured above), will make them bitter. Sometimes, that schedule can change based on environmental or seasonal factors, so make sure you're continuously checking in with your greens!
Harvesting Techniques
Equip yourself with the right tools and techniques for harvesting your microgreens. Use a knife for a precise and careful harvest. Avoid tools like scissors that could pinch your stems, causing them to rot and reducing your quality/shelf life.
I take a small bunch in my hand and gently glide the blade at the base of the greens. Don’t get too close to the soil to kick any into the greens, but get low so you’re harvesting as much of the greens as possible for the highest yields.
Chefs typically like more leaf than stem, so you may want to harvest higher based on your customer’s preferences. Stay tuned for more blog posts in the future regarding the various opportunities for selling your microgreens.
Savoring the Benefits
You did it! Congratulate yourself on growing a great tray of microgreens. Relish in the incredible benefits these tiny plants have to offer, from enhanced nutrition to culinary delights and even bringing in revenue for you and your family. Microgreens can truly enrich your life in so many ways.
By following this guide, you've gained the knowledge and skills to cultivate perfect microgreen trays in the comfort of your home. Whether you are learning this skill for yourself or a future business, you’ve taken the ideal steps to start your journey!
Related: A Quick Guide to Starting a Microgreens Business
Written by: Donny Greens