Using Silage Tarp for Organic Weed Control and Bed Prepping

What is a silage tarp?
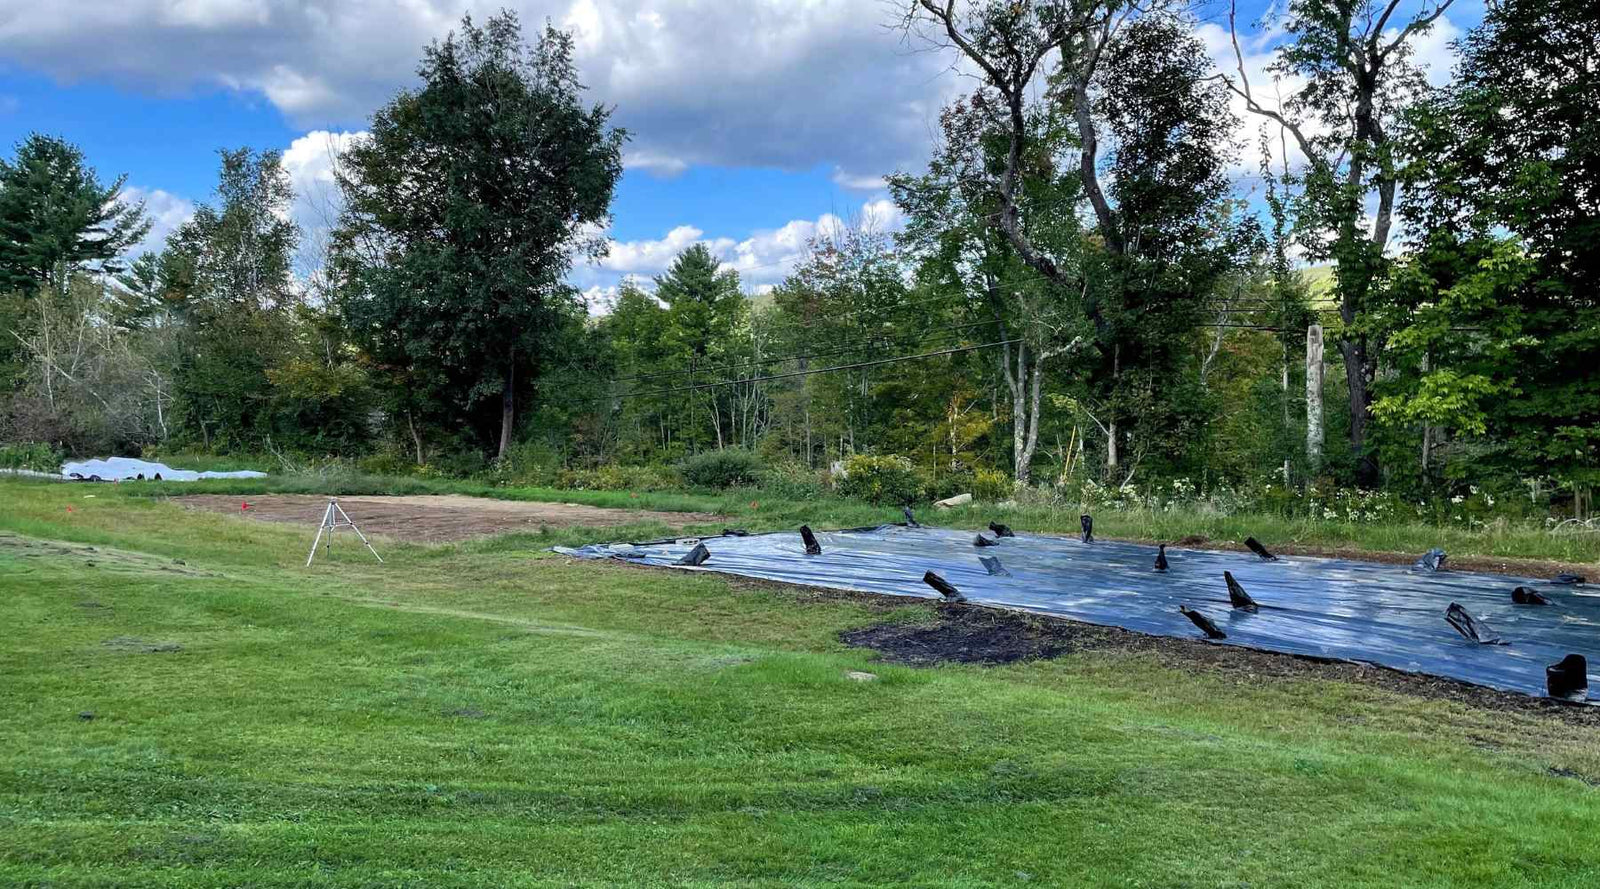
Silage tarps are heavy 5-6 mil polyethylene, typically black on one side and white on the other. They are a very useful farming tool that has taken the no-till farming world by storm in recent years. They were brought onto the scene by small-scale farmers such as Jean-Martin Fortier who used them to create stale seedbeds (weed-free) before direct seeding or transplanting. Tarps do this by creating a warm, moist environment, perfect for optimal seed germination. The tarps block all sunlight, so once the weed seeds germinate and are deprived of light, they simply die back. This process is called occultation.
If the tarp is kept on for a substantial amount of time, worms will surface and eat the decomposing debris, creating a bit of compost, giving you a weed-free and fertile planting area. Using covers in this way will create a space for your vegetable seeds to start growing without weed pressure and in an ideal environment.
Typically the tarps come in large sizes but can be easily cut to fit your plot sizes. Sizes range from 24’ x 40’ to 54' x 150’ and should always be treated to resist UV. Depending on the size, the cost can range from around $150 to a little over $1,000. They are well worth the investment as they can be multi-purpose on the farm. With proper care and storage, they should last many years. In the case of tears, punctures, or vole damage you can use greenhouse repair tape to patch tarps.

Why you should use silage tarps
After using silage tarps to cover an area, bed flipping is much easier. This includes broad forking, shaping, and planting. This is because worms and other beneficial insects have loosened any hardpan, making the soil fluffier and easier to work with. This is a huge benefit, especially for ground that has never been worked or has been fallow for a long time.
By disturbing the microbiology of your soil as minimally as possible, you allow bacteria, beneficial nematodes, and fungi to thrive, creating healthy soil and in turn, nutrient-dense food. If you have the patience, silage tarps are a great tool for minimal till and no-till growers. They are also an excellent tool to reduce weed pressure on organic farms where chemical herbicides are not an option.
How long does it take for silage tarp to kill weeds?
There are different weeds that come up at different points of the season. While it might only take 2-8 weeks to kill back the majority of weed seeds, if a field can be left in fallow and tarped for a whole season, all cycles of weeds from that entire season will not be able to thrive. Bonus!
If the purpose of silage tarping is opening up brand new land that was previously grass, it might be a good idea to leave the tarp on for as long as 12 weeks. This gives the soil time to warm up, germinate the weeds, kill them through occultation, and allows the vegetation to decompose. This in turn attracts worms and other beneficial insects. Long-term tarping may cause some compaction of the soil due to the weight of snow and rain. This is not necessarily a problem in all climates but it is something to consider when leaving them on for months at a time.
What can be used to anchor a silage tarp?
Sandbags, cinder blocks, and large rocks can be used to anchor silage tarps. The most commonly used size bag is about 14" x 26”. We ordered a 100-count pack a few years back and filled them with the many rocks we pull from our fields throughout the season as a way to save money. If you use sand, be sure it is pure and not salted, as that could potentially leach into your soil.
Don’t be tempted to fill them with dirt that could dry out and cause bags to fly off on a windy day. Also, be sure to fill them more than you think you need to, otherwise, the silage tarp will move around in the wind. A nice, tight fit to the ground is best.
Some companies now make longer bags for more surface area that features a handle for easier transporting around a farm. Whatever you choose, just be sure they are UV stable so they will last many years outside in the elements.
Depending on how big the field is, you probably want to use a weighted bag every 5-10 feet, focusing on the corners and edges on the side that wind typically blows in from.

What ground cover varieties are you using?
Here at Partners’ Gardens, we have used both Spring and Fall Green Manure Mixes as well as oilseed/daikon radish and winter rye. A spring mix is commonly made up of a number of fast growing, cool germinating varieties such as field peas, oats and hairy vetch. Fall mixes are planted in the late summer or early fall depending on your location. These mixes typically include; legumes like clovers, peas and hairy vetch, as well as winter hardy cereal grain varieties like winter rye and hard wheats.
How long do you leave the silage tarp on when using it to warm the soil?
Each year in early spring, we spend a weekend cleaning up inside our high tunnel and prepping the beds for greens planting. Once prepped, we pull a tarp inside and cover the beds to help warm the soil to a workable temperature and consistency. After about two weeks, we check in to check the temperature as we want to ensure it is not too cold or wet for seeding. We have rushed this process in the past before using tarps for this purpose and had seeds rot in the ground due to dampness or simply not germinate because it was too cold.
Next year our plan is to tarp any beds in our high tunnel that will not be in production through the winter months to keep them protected.

How to use silage tarp throughout the season
Between crops/bed flipping
For a quick, no-till bed flip mid-season, a crop can be cut out and pulled from the bed, tarped for a week or so, and then broad-forked. The tarp can cause some compaction so it is best to do the flip in this order.
We leave irrigation lines in beds being tarped to assist in germination, speeding the process along a bit.
If you only need to flip one bed at a time, strips can be cut to the size of beds for easy moving and use.
Germinating cover crops
One particular area of our farm used to be a horse-riding ring and contained very little topsoil. However, since it is one of the only flat areas of our farm, in 2020 we decided to try making this into usable land. We opened up two fields. The first of which we covered in a Spring green manure mix and mixed in some oilseed radish because of its long taproot. We then terminated it by using a BCS tractor to flail mow the crop down and turn it in with the rotary plow in the summer of 2021. We wanted to establish a strong winter rye crop on this field with plans to amend and compost with hopes of using the field in summer/fall 2022. Find out more about Winter Cover Crops in this beginner friendly article.
In our region, especially in the early-late fall, we have large groups of turkeys that roam the streets looking for a cheap snack. Cover crop seeds are their favorite and we have lost entire fields to them in the past. Last year to protect our expensive and precious seeds from birds and to speed up germination, we spread our cover crop, watered it in, and then pulled a tarp over. After 5 days or so, we had a look under the tarp. We saw a little bit of life but ended up giving it about 7 days before pulling back the tarp completely. What we saw amazed us. Not only did we get incredible germination, but the whole field was a sea of alien-like cover crop about 1.5-2 inches tall. It seemed like magic.
Related: Top 5 Benefits of Using Cover Crops in Home Gardens
Germinating finicky crops
Vegetable seeds like carrots and spinach usually have spotty germination. To help with this, strips of tarp can be cut to be a little wider than a bed. After putting seeds down, water in, and then cover the bed with the tarp and weigh it down. Be sure to know the number of days it takes for this crop to germinate and check underneath a day or so before.
Related: Maximize Planting Efficiency: JP-1 Jang Seeder and Succession Planting
*A trick is to put a few seeds down outside of the tarp of a different crop that you know will germinate consistently a few days prior to the crop being tarped. These seeds germinating will indicate you have a day or so until the ones under cover will germinate.
Just like the cover crop, tarping will create a consistent temperature and hold in moisture for better germination. Once you see seeds sprouting, remove the tarp!
To suppress weeds and serve as a light reflector
The opposite side of black silage tarps is white so some growers lay it white side up around long-term summer crops such as tomatoes in a high tunnel. This will help to suppress weeds if the tarp is stapled down just a few inches from the plant. The white reflects light, keeping it potentially a few degrees cooler which is beneficial in regions with hot summers.
Prep bed in fall for early spring planting
To get a head start on spring planting, a whole field or a few selected beds can be prepared and then tarped in the fall. In the spring, these areas will be warmer and likely drier than uncovered areas. A quick broad fork is recommended due to any compaction from winter precipitation, but other than that, the beds should be ready to plant into!

Downfalls of using silage tarps
Silage tarps are cumbersome to deal with, especially if you are keeping them in a large size. If you have willing helpers, take advantage because tarps are much easier to move with lots of hands. The same goes for folding up and storing as they can weigh anywhere from 50-160 lbs.
The other thing we have found is that voles love the heat provided by tarps so they make homes and sometimes build nests underneath them. We occasionally find vole damage from them chewing off bits of the plastic for use in their nests. We just consider this part of the “cost of doing business”. The vole damage is easily fixed with greenhouse repair tape.
If you can get a barn cat or two, they help a lot with this issue. Otherwise, traps along the outer edge of the tarps will help. Just be sure to check traps every 1-2 days and reset as needed.
Silage Tarp Storage
When you are done for the season and are ready to store your tarp, first be sure to check the weather. You want to be sure it is completely void of any moisture. If it recently rained, take a broom to remove any puddles and then allow the tarp to dry out. Moving it to a different patch of ground and/or flipping it over to allow the other side to dry is helpful as well.
The way we like to fold our covers goes like this:
Have one person on each short end of the tarp. Fold ends into the center of the tarp. Return to the edge and repeat folding to the center until it is a manageable size. Then fold it on top of itself where all the folds meet. Then fold until it is a size that is able to be picked up or dragged easily to storage. We have seen videos of farmers tying a chain around a big tarp and dragging it. We lift it into our tractor bucket and then drive it into our barn for storage.
If you have cut your tarps to fit different plots, a good tip is to mark the corner of each with the field name or the dimensions to help your spring self. Store in a cool, dry place, preferably off the ground and where critters cannot reach it while not in use so it stays clean and ready for next season.
Despite the occasional downfall, silage tarps on the farm are a fantastic tool that can save you a lot of work long term. Reducing weed pressure through occultation, helping seeds to germinate, improving soil conditions, and preparing beds for planting are all easier with silage tarp on hand.
Written by Jenna Rich @partnersgardens
Resources
https://www.uvm.edu/vtvegandberry/factsheets/plasticprimer.html
Fortier, Jean Martin. (2016). The Market Gardener. New Society Publishers.