Hoops Basics and How to Install Hoops

Putting up the hoops is one of the most dramatic steps in your build process. Finally, all of your preparation and work starts to look as big as it will be. Putting the hoops together and setting them is when the structure really starts to look like something. Read below to learn all about installing hoops for a hoop house.
Putting the Hoops Together
In most kits, including ours, your hoops will come bundled together and you will need to construct them. It could be anywhere from two to four sections of pipe depending on the width of your structure. One end will be swaged in order to fit inside the other end which will be the complete diameter of the pipe. Once you have slid all of the pieces together you will secure them with self tapping screws.
Using a center punch before you drill in this step will help you move quickly through the process. Make sure that you are installing the screws such that they will be parallel to the ground once the hoop is upright. You do not want the screw end in a place that will allow it to rub on the plastic and create a hole over time.
For ease of leveling in the next steps, mark each hoop six inches from the bottom on both sides.
Check out Prequel to Building Your First Hoop House for a list of tools needed for the build.

Installing Hoops on Ground Posts
Now that all of your hoops are put together you can begin inserting them into the ground posts. When you place the hoops it is best to have the same person start on the same side each time to keep them even. Place all your hoops into the ground posts before going back through to level and attach them.
The hoops will be slightly wider than the set ground posts. This is intentional. After you place the first hoop end into the ground post the person on the other side will push the hoop inward so it can be slid into the second post. This slight spring loading adds strength to the structure and helps keep the hoops from sliding in too far.
Need help setting your ground posts? Check out this article for help with the process.

Covering Seams and Screws on Hoops
Any place where the plastic will come up against an attachment point or seam can be a potential location for weakening of the plastic causing small holes as wind and weather move the plastic against the irregularity. In some builds you will see people using tape or felt to wrap these points. Others will attach felt strips over the hoops to smooth the surfaces where the plastic rests against the metal. Although this can be helpful it is not necessary. The 4-year-warranty UVA plastic is quite strong.
Keeping a roll of greenhouse repair tape one hand is always a good idea. Both during the build process and for the future. This allows you to quickly take care of any snags or small tears before the wind blows them into bigger problems. Repair tape is UV rated and will not break down in the sun the way duct tape or electrical tape can.
Learn all about Installing Greenhouse Plastic in this article.

Leveling Hoops
Before you attach your hoops to the ground posts, go along the structure and get them as close to level as possible. As you attach each hoop it is a good idea to use a magnetic level to get it as close to straight up and down as you can before attaching the hoop to the ground post.
If all of your ground posts are level with one another you can do the leveling by using the six inch marks. We recommend using clamps to make setting each hoop evenly easier. Start with hoops marked six inches from each end. Place a clamp on either end at the marked point.
As each hoop goes in you will sink it to the clamp. Then attach the hoop to the ground post by drilling through the hoop and putting your bolts through the post and hoop. The clamp will keep the hoop from sliding in further while you try to drill.
This is another place where using a center punch will ease your way and speed up the process. The punch mark helps guide the drill and keeps your holes lined up.

A Little Room for Error
Once all of your hoops are attached to the ground posts and you stand back from the structure to look, they may not all line up correctly. Keep in mind that a hoop house is not a complex machine and a little bit of imprecision is acceptable. The structure will still work. The plastic will still fit.
In the next steps of your build, you will have multiple additional points of contact added between the endwalls and the hoops as well as the hoops to one another. These are the steps where you will ensure that the hoops are perpendicular to the ground and correctly spaced from each other at the top.

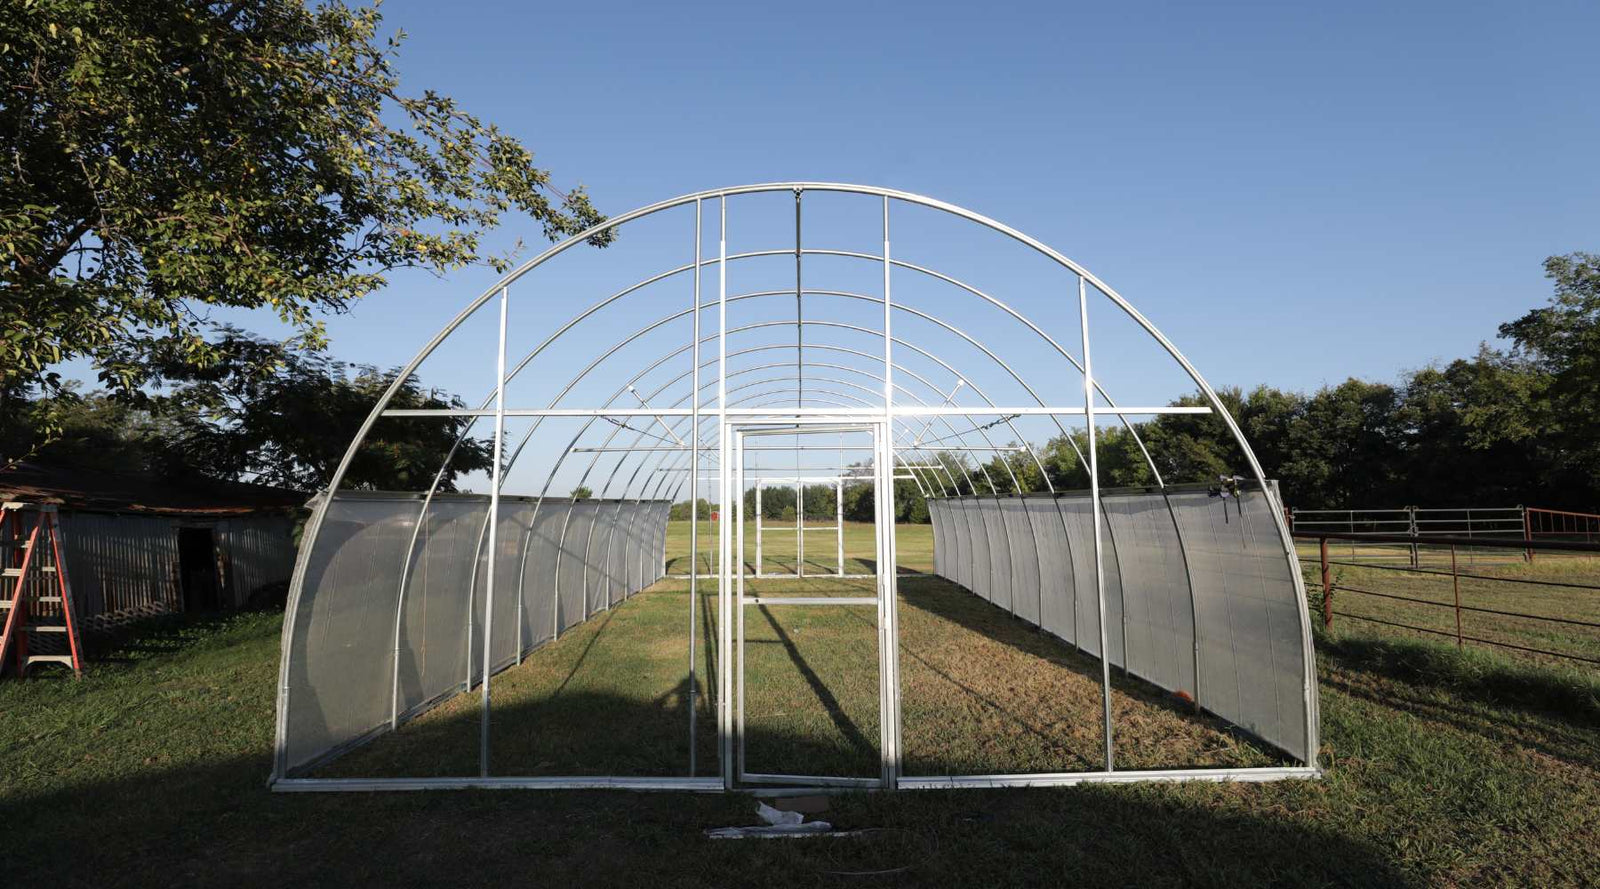
Proper Installation of Hoops for Your Build
This is one of the big moments in a hoop house build. Once you begin to put the hoops up, you will finally get to see how your work up to now has built a solid foundation. Once the hoops are all up, you will get a true feeling for how big the structure will be.
Hoops that are installed into the ground posts as close to plumb and level as possible will make the rest of your build smoother and the resulting structure stronger. You can forgive yourself for small imperfections that are visible in this step. There will be opportunities to fine tune the placement of the hoops as you attach the ridgepoles, hipboards, and baseboards in the following steps. Once the plastic goes on, the structure will smooth and any little errors will cease to be visible.
Watch the Video: