How to Use 1020 Mesh Trays for Seed Starting and Microgreens

Mesh trays are a uniquely versatile garden supply. Invest in high-quality, heavy-duty mesh trays to speed up seed-starting and up-potting. You’ll save money and labor, and increase yields compared to other growing methods.
Mesh trays allow easy bottom watering and help you grow microgreens like a pro. Their design allows you to use them with all your favorite seed-starting supplies. They come in various depths to align with what you’re growing and improve drainage.
The tiny holes in 1020 mesh trays provide proper drainage and airflow. The different tray depths also offer space for all your soil blocks. Read until the end, where we share other creative ways to use mesh trays you may not have thought of. Their countless uses on the homestead and farm make them worth every penny.
Choosing the Right Tray for Seed Starting and Microgreens
Look for these key characteristics in seed-starting and microgreen trays:
-
Durability
-
Food-grade, BPA-free materials
-
Compatibility with other trays needed for bottom watering
-
Pricing that fits your budget
-
Dimensions required for your project
Shallow and deep trays come in mesh or solid forms with or without drainage holes. Each has pros and cons.
|
Solid Trays with Holes |
Mesh Trays |
|
|
Pros |
|
|
|
Cons |
|
|

Seed Starting Using Mesh Trays
Seed-starting methods include:
-
Soil blocking with mesh trays
-
Planting seeds in mesh trays
-
Growing in mesh trays without soil
Soil Blocking With Mesh Trays
Start seeds without cell trays or pots by soil blocking. This method provides extra airflow, enhancing the root system and reducing the risk of becoming rootbound. Plus, it cuts back on plastic use, making it eco-friendly. Snag a starter kit, which comes with everything you need. The mesh and solid-bottom trays make it nearly impossible to dump your soil blocks over accidentally.
A few of our favorite soil blockers are the micro, 2”, and Maxi 1.
|
Soil Block Size |
Blocks Made |
Benefits |
What It’s Best For |
|
¾” micro (Jessica from Sierra Flower Farm's most commonly used) |
20 |
|
|
|
4 |
|
|
|
|
1 four-inch block |
|
Up-potting smaller blocks |

To soil block:
-
Pre-moisten your soil and mix it thoroughly with your hands. Remove any large chunks of debris.
-
Practice blocking to determine if the soil has enough moisture. If not, add more water.
-
Fill a mesh tray with blocks of the same size, or experiment with adding multiple sizes.
-
Use pins to create holes and sow seeds.
-
Put the mesh tray into a bottom tray of the same depth, with or without holes.
Not ready for the world of soil blocking? Air prune trays offer all the same benefits and come in bright colors or black.
Preparing Mesh Trays for Direct Seeding
Evenly distribute the seed-starting mix over your chosen tray by running it through your hands above the tray to break up any clumps. Loose soil:
-
Creates good seed-to-soil contact
-
Aerated for breathability
-
Increases germination rates and healthy roots.
Healthy roots travel through the soil to access the necessary water and nutrients.
Planting Seeds in Mesh Trays
You can sow seeds directly into mesh trays filled with soil. Select shallow or deep trays based on seed requirements. For instance, you may sprinkle 20-30 basil seeds in strips across a shallow mesh tray. They grow slowly and don’t have a strong root system in the early stages. But, fast-maturing nasturtiums form a long taproot quickly, so sow those a few inches apart in a deep mesh tray.
Thin and up-pot as needed. This article compares cell tray and pot sizes and recommends crops that perform well in each.
Do you have seeds with poor or questionable germination? Scatter them densely over a mesh tray to reduce soil waste and save space in the greenhouse.
How to Directly Sow Various Seeds in Mesh Trays
Sow seeds two to three times as deep as their diameter and cover them with soil. If they need light to germinate, press them into the soil and do not cover. Lay long, flat seeds like squash and cucumbers horizontally or pointed (radicle) end down. If germination rates are low, sow more than one seed per cell. Avoid overcrowding by spacing them out as recommended on the seed packet or by crop type.
Growing in Mesh Without Soil: 3 Ways
-
The fibrous material of our pre-cut hemp mat helps retain moisture, which may increase germination rates. It’s ideal for wheatgrass and microgreens. When you're done with it, toss it in your compost pile.
-
Add sterile coco coir to a mesh tray or mix it into your seed-starting mix for improved drainage.
-
To grow hydroponically, use Rockwool cubes inside mesh trays. Grab a mesh tray set that comes with the supplies you’ll need. Read more here.
Watering and Maintenance of Mesh Trays
Lightly mist trays before the seeds have germinated between waterings as needed. You may not need to mist if you use a humidity dome.
Once seeds germinate, bottom water by setting mesh trays inside a tray with no holes filled with a cup and a half of water. Set it gently to avoid splashing or drowning delicate baby greens or seedlings. Make sure the water touches the bottom of the mesh. If the soil is still dry, add more water. Add a cup at a time until the soil is evenly moist.
Monitoring Germination and Seedling Health
Keep conditions consistent until germination. After germination, remove humidity domes and the trays from heat, if recommended. Give the new sprouts light immediately and amend your watering schedule if needed. Note patchy germination or overcrowding, and change your seeding accordingly next time.
Avoid under- and overwatering and adjust watering if you notice these signs:
-
Dry soil, wilted leaves, and stunted growth indicate underwatering.
-
Overwatering will show up as damping off, mold, pest pressure, yellow leaves, and stunted growth.
You’re not in the clear just yet. Young Swiss chard, brassica, tomato, and pepper seedlings are especially vulnerable to damping off. To avoid this, provide good drainage and ideal temperatures, limit humidity, prevent mold, and only water when needed. Use clean seeds, soil, and containers to ensure last year’s pathogens aren’t affecting this year’s crops.
Related: How to Bottom Water Your Plants (Without Overdoing It) Step-by-Step

Using Mesh Trays for Microgreens
Mesh trays are the gold standard for efficient, healthy microgreen production. Microgreen growers love them for their enhanced airflow, which helps keep roots healthy, reduces disease risk, and provides consistent growth.
If you’ve grown micros in regular 1020s or trays with no holes, you’ll instantly see the benefits of using mesh trays. Our heavy-duty trays are sturdy and designed to hold lots of weight. Plus, they feature tabs for quick lifting and tray transitions when bottom watering.
Bootstrap Tip
Use the colored trays to organize your microgreens by variety or date sown.
Planting Microgreen Seeds in Mesh Trays
Use our Ultimate Microgreen Cheat Sheet as a guide to help you grow microgreens. It includes ideal seeding rates. Here are the seed density recommendations per 1020 tray for a few of our favorite, reliable microgreens:
- Arugula: 12 grams or 0.4 oz
- Broccoli: 15-20 grams or 0.5 oz
- Cabbage: 15-20 grams or 0.5 - 0.7 oz
- Radishes: 30-35 grams or 1 oz
- Pea shoots: 200-275 grams or 7-9 oz
Time Saver
Use an herb jar lid to sow consistently by sprinkling seeds over the tray. The rate depends on the seed size and days to maturity.
While more scientific research is needed to understand microgreen health benefits, studies like this one from The National Library of Medicine concluded that “they’re a stellar source of phytochemicals, such as essential minerals, polyphenols, carotenoids, chlorophyll, anthocyanins, glucosinolates, etc.”
Growing on a larger scale? Check out the Little Green Seeding Machine for streamlined seeding for microgreens.

Watering Microgreens in Mesh Trays
Top water newly seeded microgreen trays with a mister or gentle nozzle before stacking them. Switch to bottom watering after germination. Bottom water microgreens in these seven simple steps:
- Fill a solid bottom 1020 tray with an inch of water (1 ½ to 2 cups).
- Remove your mesh tray of micros from its base and gently lower it to the water-filled 1020.
- Make sure the water is deep enough to reach the roots without water-logging the mesh tray.
- Allow the roots to soak up water for up to 20 minutes.
- Add more water if the soil has soaked it all up and is still slightly dry.
- Remove the mesh tray and allow excess water to drip off the roots.
- Place the mesh tray back into its storage tray.
If your bottom tray doesn’t have holes, dump water that drips into it to enhance breathability and prevent fungal disease. Check the moisture levels two to three times a day as you learn what each tray and crop requires. Allow the soil to dry out slightly before watering.
Game Changer
Run an oscillating or grow rack fan to prevent soggy soil and pests.
Harvesting Microgreens Grown in Mesh Trays
Our microgreen cheat sheet conveniently includes the days to maturity and the ideal harvest day. With experience, you’ll know when to cut the greens by examining the leaves.
Sow shorter microgreens in shallow trays so you can harvest them down to the root without the height of the deep trays getting in the way. Use deep trays for crops like pea shoots that you can grab without causing damage.
Refer to our other microgreen guides and blogs to help you grow them like a pro.
Harvesting methods and tips:
- Gently glide a very sharp chef’s knife or harvest knife at the base of the greens.
- Don’t go too low, or you’ll risk soil contamination.
- Hold small bunches of greens in your hands at a time.
- Move slowly and confidently.
- Avoid using scissors, which might bruise the stems and reduce the shelf life.
Farm Hack
Use a blackout humidity dome to stretch the stem length for chefs who prefer them longer.

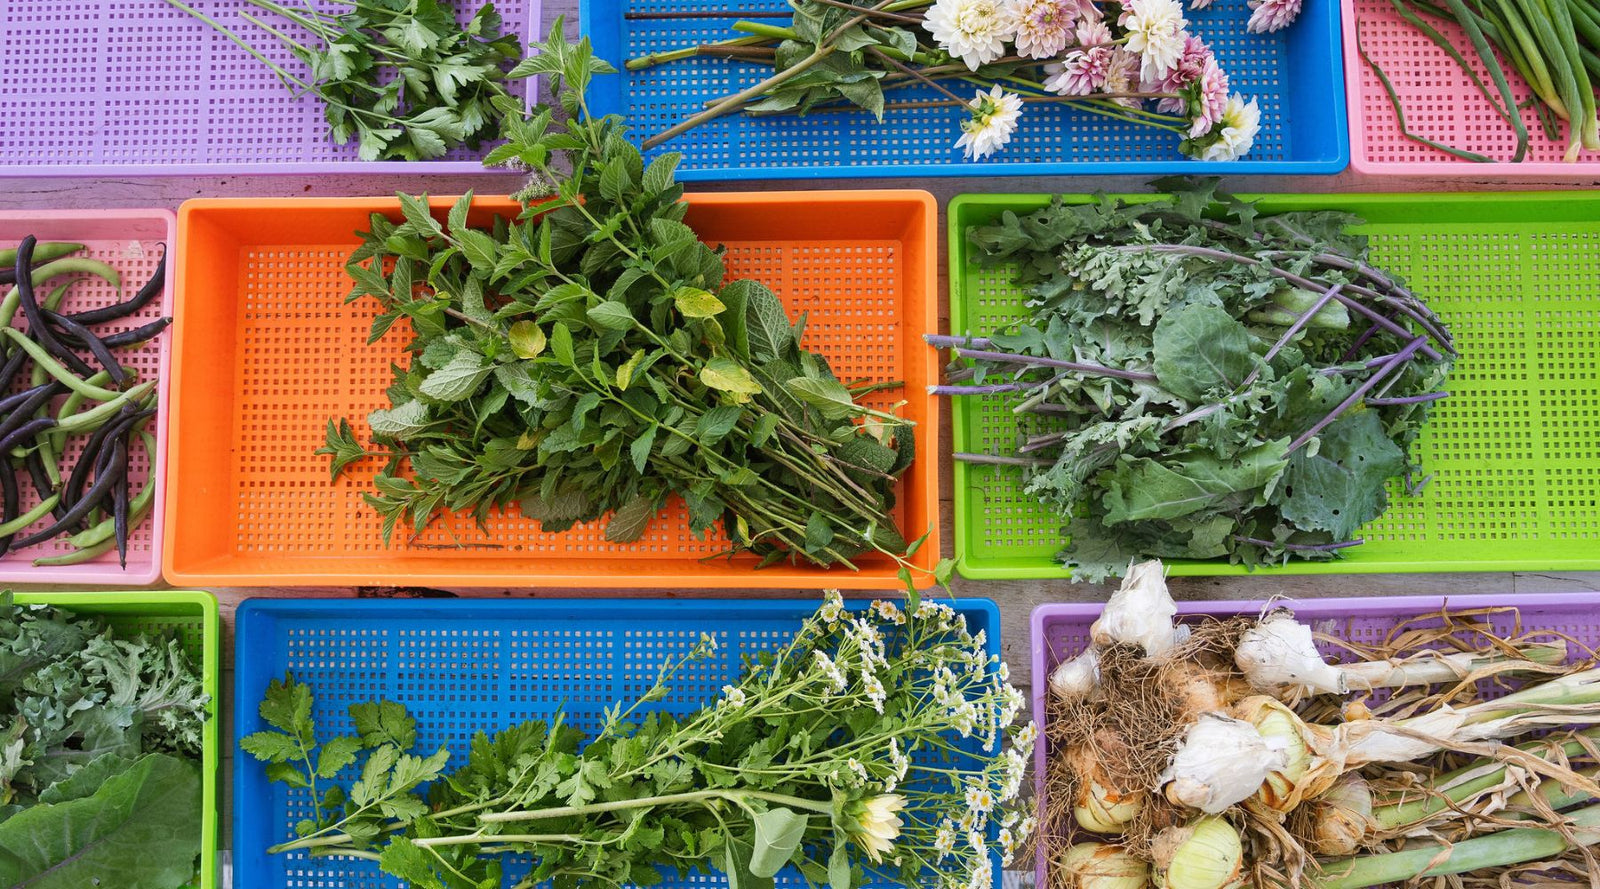
Other Creative Ways to Use Mesh Trays
As if you didn’t already love our mesh trays enough, as promised, here are some other ways to use them you might not have thought of.
Using Mesh Trays with Pots or Cell Plug Inserts
Pair our air-pruning 4-cell- and 6-cell plugs with deep mesh trays for the ultimate watering setup. Fill the mesh bottom with inserts and store them in a deep 1020. A 1020 fits 12 or eight inserts, respectively. To water, move the mesh tray to a water-filled deep 1020 without holes. When the inserts are done soaking up water from below, move the mesh tray back into the tray with holes. The holes help drain excess water and provide some circulation.
Inserts are perfect for cuttings, tomatoes, and herbs. However, they aren’t compatible with humidity domes in 1010 or 1020 trays; the fit is snug.
Mesh trays are also great for supporting CowPots® before transplanting.CowPots® are great for cucurbits and other plants that don’t do well with root disturbance. A mesh tray makes it easy to move and water lots of CowPots® at once without the risk of tearing them.

Sifting Soil With Mesh Trays
Sift homemade compost or potting mix to remove debris like rocks, twigs, and veggie scraps that have yet to break down. This process creates lighter soil, improves drainage, and increases plant growth.
Mesh Trays and Vermicomposting
You can build a vermicomposting sifter with wood, a metal mesh screen, and staples, but why not use your existing mesh trays? Running vermicompost through a sieve produces an ultra-lightweight, silky product. It’s easier to store and spread in the garden, plus you can add to houseplants for a nutrient boost.

Starting Dahlia Tubers and Ginger
When it’s time to wake up your dahlia tubers or start ginger:
- Fill a 2.5” deep mesh tray with soil an inch or so deep
- Lay your tubers or rhizomes horizontally and sprinkle more soil on top of them
- Nestle the tray into a deep 1020 with no holes
- Keep the tray damp and warm for several weeks until sprouting
- Use a heat mat to keep the temperature consistent and increase germination speed
Read more in How to Successfully Start Dahlia Tubers Indoors: A Beginner's Guide.
Drying Herbs in Mesh Trays
Use mesh trays to dry herbs to provide excellent airflow, allowing them to dry evenly without forming mold or mildew. Lay cuttings in a single layer atop the tray, leaving plenty of space between each. Set the tray in a dark, cool place.
Turn herbs with a high moisture content, like mint and basil, daily to prevent mold. Rosemary, thyme, and lavender aren’t as prone to mold, so turn them every few days.
Growing Fodder
Easily grow legumes, grains, greens, and grasses for your flock with mesh trays. Grab some 5x5 inserts or pots and arrange them in a deep mesh tray. When it’s time to water, follow the bottom watering method outlined above. Learn about our favorite sprouted fodder options in How to Grow Fodder Indoors for Chickens.

Cleaning and Maintaining Mesh Trays
Disinfect and properly store your trays. They’ll last longer, prevent degradation, and uphold the two-year warranty Bootstrap Farmer’s trays come with.
How to Clean Mesh Trays Properly
Hygiene is everything, especially for delicate microgreens. Don’t let lingering bacteria affect germination and your crop. Grab these supplies:
-
Sturdy brush designated for cleaning trays
-
Clean water
-
Mild detergent
-
White vinegar
-
Optional disinfectant of your choice: H202 regular, or food-grade peroxide
-
Drying rack
Bootstrap Tip
Use a sturdy metal bread scraper to remove tough roots in one swift motion. They’re inexpensive, long-lasting, and ergonomically friendly.
Use the brush to remove dried debris. Wash the trays with mild soap and water, scrubbing off any dirt or debris in corners and cracks. Rinse thoroughly. Spray them with a diluted vinegar solution and allow them to dry for ten minutes before rinsing them again. Optionally, spray them with an H202 solution and let them dry thoroughly before storage.
Do you need to wash a lot of trays quickly? Check out our commercial tray washer. The pressure washer is sold separately.
Watch to learn more about H202 in How to Dilute Food Grade H202 and When to Use it.
Does Cleaning Trays Matter?
You might not get hit with a disease after skipping one cleaning session, but why risk it? Avoid crop loss and keep your micros healthy by cleaning your trays after each use. Sneaky pathogens can hinder germination rates, cause damping off, and crop loss.
Read more in How to Wash and Care for Seedling Trays.
Best Practices for Tray Longevity
Allow clean trays to dry before storing them. Keep various sizes, types, and depths of trays stacked together to grab what you need during your busy season quickly. Store them together and out of direct sunlight to prevent warping and cracking due to degradation.

FAQs: Using 1020 Mesh Trays for Seed Starting
What is the difference between mesh trays for microgreens and regular trays?
Mesh trays offer excellent drainage and airflow, making it a breeze for bottom water. The constant air circulation prevents mold and allows the roots to air prune, bulking up your yields. Mesh trays may need to be watered more often than regular trays with holes.
How do I prevent mold when using mesh trays for seed starting?
Pair mesh trays with 1020 trays with holes to help drain excess moisture and prevent mold and damping off. Mold thrives in damp, dark environments. To reduce the risk, let the soil and roots breathe and dry slightly between waterings. Use a fan or dehumidifier if your grow area is humid or stagnant.
Can I reuse mesh trays for multiple growing cycles?
You can reuse the trays but: We don’t recommend reusing growing media for another cycle. Immediately after harvest, roots break down, which may attract bugs and mold and increase the risk of fungal disease. For alternatives, check out Reusing Spent Trays of Cut Microgreens.
Do mesh trays work with all kinds of seeds?
Mesh trays are often used for large seeds or fodder crops, but you can also use them with tiny seeds sown in coco coir or soil, offering increased drainage. Use deep trays for chives, sunflower shoots, pea shoots, and tall summer crops like tomatoes and peppers.
Are mesh trays suitable for growing indoors and outdoors?
You can use mesh trays indoors and outdoors. Direct or harsh sunlight will lead to degradation and discoloration over time, so store trays in a dark, cool area when not in use to extend their longevity.
How do mesh trays compare to soil block makers for beginners?
Soil blocks are beginner-friendly when used with a mesh tray. Our range of blocks has something for every level of gardener. The mesh makes it easy to bottom water without accidentally dumping the blocks.
Do I need to buy an outer tray to use with mesh trays?
The mesh trays are designed to sit inside a bottom tray without holes of the same depth.