Composting for Beginners: Easy Steps to Improve Your Soil

A Simple Guide to Composting for Beginner Gardeners
If you’re not a composter but want to start, what’s stopping you? Maybe you’ve heard that it’s stinky, complicated, or time-consuming. Perhaps the idea of rotting food in your yard grosses you out. We’ve got easy solutions for your most pressing concerns. We promise that composting for beginners can be fun, straightforward, and odor-free.
This guide will help you enhance your garden’s soil and reduce your environmental impact. Continue reading to learn how and why to compost at home with our easy-to-follow composting basics.
What Is Composting?
Composting is the decomposition of organic materials with help from microorganisms. Several months of mixing in water and air produces an earthy, crumbly matter. Finished compost is affectionately known as “black gold” for its high value in the farming and market gardening world.
Consumer goods made from recycled glass or plastic are relatively well-known these days. Think of composting as mother Nature’s way of recycling organic resources.

Benefits of Composting for Backyard Gardeners
Home composting offers numerous benefits for your farm or garden. For example, composting can:
-
Reduce kitchen and yard waste
-
Save money on fertilizer
-
Build better soil and boost plant health
-
Increase yields
-
Increase organic matter
-
Enhance microbiological diversity
-
Minimize run-off and compaction
-
Help maintain consistent soil temperatures
-
Retain soil moisture, especially in sandy soils
When you compost, you can feel good about the positive impact you’re making on the environment.
In 2022, the Environmental Protection Agency (EPA) reported that municipal solid waste landfills were the third-largest source of methane emissions caused by humans. Quantifying Methane Emissions from Landfilled Food Waste estimates that it’s roughly equivalent to the emissions produced by 50 million gas-powered passenger vehicles. Composting at home may seem like a small effort, but it can have a significant impact on the environment.
Read more in Composting Food Waste: Keeping a Good Thing Going.
How to Start Composting: A Step-by-Step Guide for Beginners

Choose the Right Composting Method for Your Space
How you compost depends on your space and preferences. Here are a few options to consider.
-
For an outdoor compost pile, select a location near your garden and a water source. Avoid areas with direct sun and harsh winds
-
If your growing space is small or you don’t want to see a pile in your yard, buy a stand-up tumbler. This hides the contents and is more aesthetically pleasing. Select a size that suits your lifestyle.
-
Bokashi is an indoor composting method that utilizes fermentation to break down organic matter. Bran flakes reduce odor, and the result is a concentrated juice. Dilute it with water and use it for a garden boost. You can add meat, bones, and dairy scraps to bokashi bins, unlike traditional composters.
-
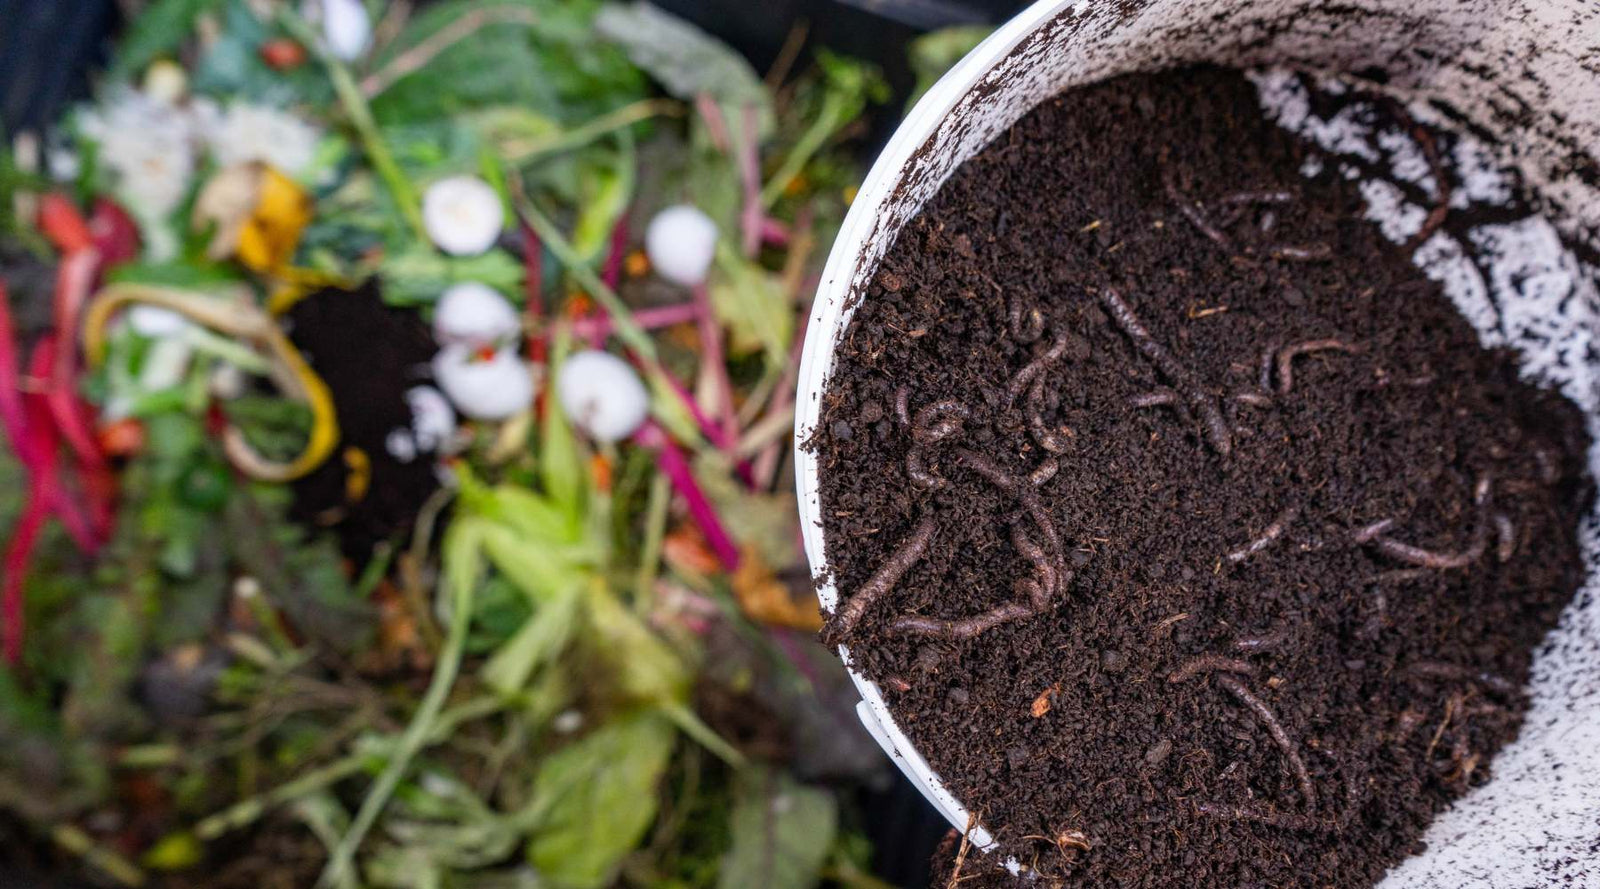
In-ground worm bins are a hands-off, space-saving option. Bury the container in your garden, leaving the lid accessible. Add bedding, food scraps, and composting worms. Worms aerate the soil while breaking down the food scraps, and produce worm castings. Use worm castings to promote robust root development in seedlings, enhance yields, improve water retention, and increase drainage.
- Love DIY projects? Make your own DIY composting bin! Drill holes in a plastic storage tote or trash can and bury it six inches underground. The holes encourage worms to go inside. Water the contents regularly to keep them moist. Materials will break down within two to six months, depending on weather conditions. No turning needed!

The Brown and Green Rule: What to Compost
Greens and browns are the types of materials you’ll add to your compost pile or bin. Greens are a source of nitrogen and protein for microorganisms. Browns are a source of carbon and energy. Here are some common examples of each:
Greens
-
Fruit and veggie scraps
-
Grass clippings
-
Coffee grounds
-
Garden debris
-
Eggshells
-
Tea bags
Browns
-
Straw
-
Dry leaf mulch
-
Sawdust (avoid chemically-treated wood)
-
Newspaper and paper towel rolls
-
Twigs and small sticks
-
Wood ash
-
Cardboard with black ink only and no food debris
-
Garden prunings and cuttings
While there is no hard and fast rule, experts suggest using a 2:1 or 3:1 ratio of browns to greens to keep microbes thriving. Too much green may cause your compost to become soggy or stinky, while too much brown will slow down the decomposition or dry out the pile. Observe what’s happening in your pile and adjust as needed.
Avoid adding any of these items to most compost bins:
-
Dairy products
-
Oil, fat, grease
-
Meat and seafood scraps
-
Chemically-treated plant debris, sawdust, or cuttings
-
Perennial weed roots
-
Plastic
-
Pet waste
Keep this list near your compost to help remind everyone in the household what can and cannot go into your bin.

Building Your First Compost Pile or Bin
After picking the perfect spot for your pile or tumbler, follow a few basic steps to get your compost started:
-
Lay a base layer of sticks or twigs to provide airflow. For tumblers, locate a level area.
-
Add about four inches of browns to help soak up moisture and prevent rot.
-
Top with several inches of greens.
-
Water between layers.
-
Continue alternating until your pile is 3-5 feet high and wide. It will be difficult to turn if it’s much taller.
-
Aerate the pile every 2-4 weeks, or as often as every few days, as needed. Turning brings oxygen to the layers, which is crucial for proper breakdown. According to the Oklahoma State University Extension’s Compost Turning: The Key to Quick Composting, turning more often yields quicker results, whereas less turning results in a larger finished product.
-
Once you start turning the pile do not add new material.
Many composters choose to have two piles or tumblers so one can be “cooking” while you keep adding to the other. That’s it!
Bootstrap tip: Keep a log of watering frequency, results, smell, size, and materials added. Adjust accordingly.
Common Composting Problems (and How to Solve Them)
Composting can be complicated, but keep it simple. The pile of materials will break down, regardless of your actions. Balance the ingredients, add water, aerate to allow for aerobic (oxygen) activity, and monitor progress to ensure success. Don’t stress too much about exact ratios.Continuously observe your pile and check it for signs of imbalance. Adjust as needed to correct it.
Use this chart to help identify and solve common composting issues if any arise.
| Issue | Solution |
|---|---|
| Pile not breaking down | It may be too tightly packed. Aerate the pile and add water to kickstart activity. |
| Rotting smell | Increase aerobic (oxygen) activity by turning the pile. |
| Ammonia smell | Too much nitrogen. Add straw, paper, coco coir or dry leaves for balance. |
| Too wet/slimy | Add more brown materials. |
| Too dry | Mix in more water. |
| Rodents | Review the items to avoid, like meat scraps and dairy. Add a cover or fence if necessary. |
How to Know When Compost Is Ready
When you can no longer recognize the ingredients, give it a good sniff. Finished compost smells fresh and earthy, and will be a dark brown color. It should crumble in your hands.
At this point, let your compost age more, divide it up into your gardens, or store it for later use.

Using Your Finished Compost in the Garden
As mentioned above, finished compost should smell fresh and earthy. It will be dark brown, almost back in color. You shouldn’t be able to identify any of the individual ingredients in your compost (i.e. no banana peels or lettuce scraps). It should be crumbly, soft, and look and feel like soil.
If your compost looks and smells ready, here are a few ways to use it in your garden for maximum benefit:
-
Mix it into homemade potting soil. Sift and use your new mixture for planting in mesh trays and flats.
-
Use a tilther or rake to combine compost into the top layer of garden beds before direct sowing seeds.
-
Spread it around young seedlings to help retain moisture and heat while reducing weed pressure.
-
Side dress along tomatoes, eggplant, cucumbers, and peppers. The soil structure will improve throughout the season. A better soil structure enhances root systems, making it easier for plants to absorb nutrients and water.
-
Top off containers and metal raised beds at the start of the season.
When to Use Compost
Compost is most effective when applied in the spring and fall. Mulch around new seedlings in the spring, or garlic before going into winter. Alternatively, top or side-dress long-season crops, such as tomatoes, peppers, and potatoes, throughout the season.
Related: What You Need to Know for Successful Winter Growing in High Tunnels, Greenhouses, and Gardens.

Composting Tools to Make the Process Easier
These tools will help support easy composting to keep your soil at its healthiest:
If DIY compost piles aren’t for you, there are countless tumblers on the market. They’re perfect for gardeners who don’t want to see the compost as it decomposes. Tumblers range in color, size, and style.
More From Bootstrap Farmer
-
Beginner's Guide to Soil Fertility: Simple Steps to Boost Your Garden’s Health
-
A Beginner's Guide to the Best Soil Amendments for Healthier Gardens

FAQs
What’s the easiest way to start composting at home?
Start indoors with a bokashi composting kit. The bran helps keep the smell away, and it’s a quick way to achieve results. Boost your garden with diluted bokashi juice. When you’re ready to move outdoors, start a 3x3x3-foot compost pile using the same kitchen scraps, along with browns and water. Follow a 2:1 or 3:1 ratio of browns to greens. Turn it throughout the year as it breaks down.
How do I keep compost from smelling bad?
Balance your greens and browns. If the pile smells like rotting food, add straw, grass clippings, or newspaper to absorb some of the moisture and mitigate the odor.
Can I compost indoors?
Yes. There are many countertop compost systems to choose from. Many growers compost indoors during the winter and move outdoors when the weather warms up. Vermicomposting with worms works great in a garage.
What food scraps can I compost?
Compost most kitchen scraps like:
-
Carrot peels
-
Banana and citrus peels
-
Kale stems
-
Apple cores
-
Eggshells
-
Coffee grounds
-
Stale (not moldy) bread
Avoid meat and dairy in standard compost bins (okay for bokashi).
Do I need to turn my compost pile?
Turning your pile will result in a faster finished product; it also increases the volume of finished compost. Turn it from every few days to once every few weeks.
How long does composting take?
The time it takes from raw materials to finished compost varies from a few months to an entire year. The timeline depends on growing zone, weather patterns, ingredients, pile size, and how often you turn your compost.
What’s the difference between compost and fertilizer?
Compost enhances soil structure, helps retain moisture, and reduces weed growth. Fertilizer, on the other hand, is formulated to provide exact measurements of nitrogen, potassium, and phosphorus. These nutrients are immediately available to plants. While compost does contain levels of NPK, its nutrients are slowly released.
Can compost attract rats or bugs?
Compost piles can attract rodents and pests. Balancing greens and browns will increase aeration and reduce smell. Avoid meat and dairy products, and consider adding a cover or fence.
How do I know when compost is ready?
Finished compost should look, feel, and smell like soil. If you can still identify the materials you added, it needs more time.
Can I compost if I live in an apartment?
You can compost in an apartment to reduce food waste. If you don’t have outdoor space, try a countertop compost bin, worm farm, or bokashi fermenting system.