How to Use Heat Mats for Starting Seeds

Why Heat Mats Matter for Seed Starting
Heat mats are a vital part of an efficient production plan when used properly. The number one thing to consider is that not all crops are created equal. Starting seeds in the ideal environment means taking a look at the individual needs of each crop and sometimes each individual variety.
Do You Need a Heating Mat to Start Your Seeds?
One of the main questions we get is, "Do I even need a heat mat to start seeds?" You may not need one if you are just starting a few seedlings indoors to save a little money on your spring garden plants. However, considering the soil preference, temperature preference, and light preference can be different for every variety of seeds, the answer is probably, “Yes, if you are growing a wide variety of crops from seed.”
The germination requirements for lettuce seeds differ significantly from those for chili peppers or tomatoes. While your lettuce seeds may germinate just fine in an unheated room or shed where the temperatures range from 40℉ to 65℉ (4°C to 18°C) in the spring, other gardening staples will not. Tomatoes, for example, rarely germinate below 75°F (24°C). To start these properly, you will need to warm the soil using seedling heat mats.
When a Heat Mat Is Worth Using
- If you are planning to start seeds with special requirements or even just in a space outside their preferred temperature, having a seedling heat mat can be the key to a successful start to every growing season.
- If you are going to germinate heat-loving crops like zinnias or chili peppers, using a heat mat can give you a significant jump on the growing season. These crops frequently take 7-14 days to germinate if left to their own devices. Grown on a heating mat, these seeds can germinate quite well in a few days.
- If you need to start a large quantity of seeds and ensure uniform germination and growth, using a heat mat for propagation is one of the best ways to get an even start.
- If your seeds have specific temperature requirements for proper root growth or the development of specific traits. For example, zinnias grown outside their preferred conditions may revert to single-petal blooms rather than the larger, multi-layered petal style.
When to Stop Using a Heat Mat
Heat mats are most useful during germination, when seeds need warm, consistent soil temperatures to sprout evenly. Once most seeds have emerged and seedlings are up, the heat mat should be turned off, or the trays should be moved off the mat.
At that point, light becomes more important than bottom heat. Leaving seedlings on a heat mat after germination can lead to fast, weak growth and leggy plants. Removing heat after emergence helps seedlings develop stronger stems and supports healthier growth moving forward.

Germination Requirements You Need to Know
Consider soil preference, temperature preference, and light preference for all of the crops you will be starting from seed.
In this article, we will focus exclusively on the soil temperature preferences of your crops. Using the correct germination temperature for your seed-starting process has several benefits, including increased seed germination rates, quicker germination times, and healthier plant starts overall.
How to Find the Right Germination Temperature
The right germination temperature comes from matching your heat mat to the needs of the seeds you are starting. Each crop has a temperature range where it germinates best.
By checking seed supplier information and understanding how different crops fall along the temperature spectrum, you can set your heat mat once and get more consistent, even germination across your trays.
Looking Up Plant Varieties’ Needs on Your Seed Supplier’s Website
Most reputable seed suppliers will provide the information you need to get your seeds started right. If you have a favorite seed supplier, take the time to look through their website. You may have to scroll past the general description to find the ideal soil temperatures for seed germination.
Check the seed packet for the plant's growing preferences. This information will include days to germination, preferred temperature, proper seed spacing, and differences between indoor and outdoor starting recommendations.
To find the best temperature to set your mat at, list the preferred temperature range for each variety you will be starting. Once you have all of this information at your fingertips, you can identify your ideal ranges.
Using the Bell Curve of Planting Temperatures
Thinking about plotting your varieties along a bell curve can be very helpful. Some plants, like lettuces, will germinate in the lower ranges of 55℉ to 65℉ (12°C to 18°C). Most plants will happily sprout in the 65℉ to 75℉ (18°C to 24°C) range. A few plant species, including peppers, tomatoes, and some flowers, prefer temperatures between 75℉ (24°C) and 90℉ (32°C).
Some companies include ideal ranges in the information listed on the seed packet, but most have only general information, such as days to harvest and plant spacing. For more specific information, refer to the website or research your variety online with a reputable source.
Examining Temperature Ranges
Now that you know the ideal ranges for all the varieties you will be starting, you can find the Goldilocks zone for your seedling heat mat setting. The Goldilocks zone is just what it sounds like: not too hot and not too cold for everything that needs a little boost of warmth to get started.
In an indoor setup where you're already at 70°F (21°C), many plants that prefer the lower end of the bell curve will germinate well, possibly only needing the heat mat when overnight temperatures drop. However, with peppers and tomatoes, you will want to bump the heat up to around 10℉ (-12°C) to get you more toward the high end of that bell curve.

Grow Room Ambient Temperatures and Handling Fluctuations
If you are starting all of your seedlings indoors, you will likely have control over the room's temperature and can control the temperature of your propagation trays with the mat.
Indoor vs Unheated Spaces
However, if you are starting your seeds in an unheated space like a shed or garage, overnight temperatures may drop below what the mat can compensate for. The mats can only raise the soil temperature a maximum of 20° above the temperature of the space they are in.
If you are still within ideal ranges, your seeds should sprout just fine. If you know it will fluctuate beyond that range, you may want to bring the trays into a more protected space overnight.
Using Humidity Domes with Heat Mats
Add humidity domes to your seed germination setup to help retain a little extra heat. A dome will also protect your seedlings from drying out. The heating mat will cause more water to evaporate from your growing trays, potentially leading to growth problems if you forget to water.
 Using a Heating Mat to Start Flower Seeds
Many flower varieties are even more finicky than vegetables when it comes to optimal germination temperatures. For example, Lisianthus requires a specific temperature range of 70℉ to 75℉ (21°C to 24°C) during the 10-15 day germination phase. This must then be reduced and maintained at 60 to 70℉ (15°C to 21°C) for an additional 45-50 days for proper development.
If you start multiple varieties of flowers for a cutting garden or farm, you may find that having two distinct setups gives you the best starts. As we recommended above, with vegetables, research the ideal germination temps for each variety and group them by Goldilocks’ zone. Keep in mind that many types of flowers will need temperatures to change higher or lower after germination, depending on your desired transplant date.
Heat-Loving Flowers
Zinnias, sunflowers, celosia, and many other high-performing, heat-tolerant cut flowers prefer to germinate at higher temperatures. 75℉ (24°C) is an excellent general temperature for germinating many summer flowers. Some, like zinnias, will do best when started at even higher temperatures in the 80°F to 85°F (26°C to 29°C) range.
Cool Germinating Flowers
Scabiosa, cosmos, yarrow, and many other flowers that bloom in spring and summer prefer cooler temperatures for germination. Most of these flowers prefer to be in the 65°F to 70°F (18°C to 21°C) range until they have sprouted.
Be sure to harden off all seedlings properly started indoors before transplanting out. You can review our advice for hardening off seedlings at the end of our Seed Starting 101 Guide.

What's the Right Seedling Heat Mat for Your Scale of Growing?
Depending on your type of grower, you may have very different needs for heat mats and thermostats. While the home gardener may only need one small mat, a large-scale farm or homestead may need multiple mats and controllers for different temperature ranges.
Heat Mats for Home Gardeners
When choosing a heat mat, the number one thing to start with is identifying your scale.
- A 10” x 20” mat will fit one 1020 flat that can hold a 50-cell, 72-cell, 128-cell, or 200-cell, either all of one variety or a mix of varieties with the same temperature needs.
- A 20” x 20” mat will fit two 1020 flats with cell trays with the same germination requirements.
- A 20” x 48” which can fit up to four 1020 trays with cell inserts.
With all of these hobby/home gardener heat mats, if you just plug them into the wall, they will always stay on and raise the ambient temperature by about 10°. So if you're in your house and it's 70 ℉ (21°C), you're probably going to be on the hotter side of that spectrum when you plant lettuce. However, if you're in your house and your household thermostat is set to 70 ℉ (21°C), 10° over ambient temperature puts you in that Goldilocks zone for the varieties that prefer 80℉ to 90℉ (26°F to 32°C).
Heat Mats for Commercial Farms and Market Gardens
For our bigger growers, we have commercial heat mats in both a master and an add-on. Both of these will be 20” by 48”. The master mat has a plug that connects to a thermostat, which we'll discuss in the next section.
On the opposite side, it has a pigtail to plug into the add-on mat, which can then be further pigtailed depending on how many cell trays you are germinating.

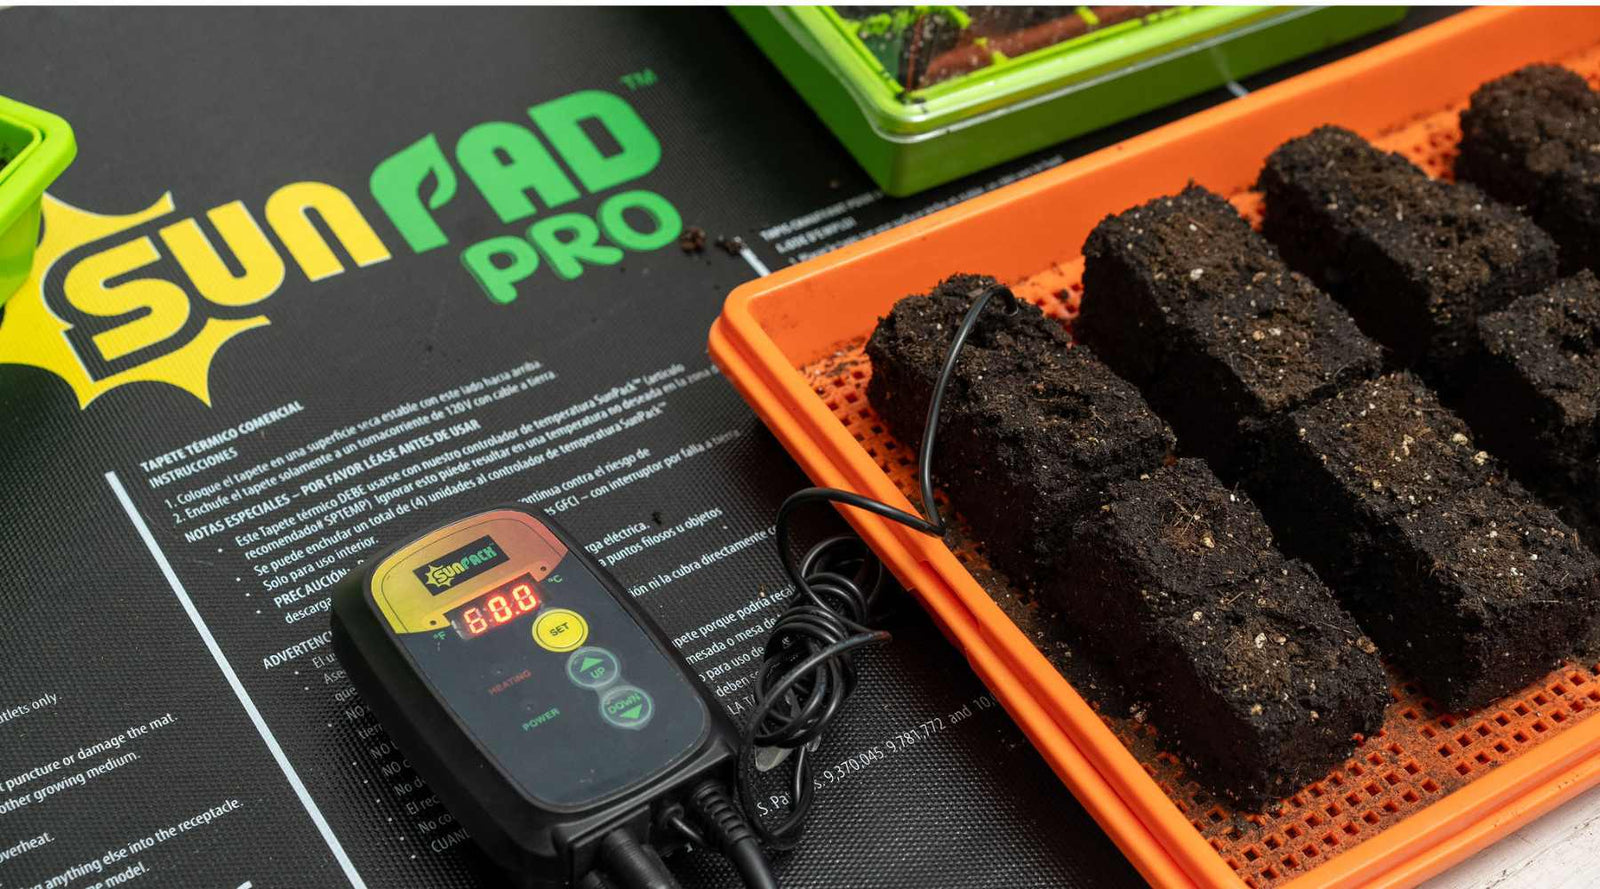
How to Use the Thermostat Controller for Seedling Heat Mats
Thermostats are the only way to control whether the heat mat turns on or off based on the climate in your growing space and to keep a steady temperature. Without one, you're just going to let your mat run that 10-15 degrees above ambient temperature.
While in use, the thermostat has a probe that goes directly into the soil, right where the seed will be. Although the mat will frequently heat up above ambient room temperature, it keeps the soil temperature steady at your preset ideal, with water flowing through the 1020 bottom watering tray, the cell tray, and the soil.
The water is a factor in temperature fluctuations as well. As you add water, it will be at a different temperature and conduct heat differently. With all of this in mind, it really helps regulate the temperature as best you can at the soil where the seed is actually located.
Parts of the thermostat
The bottom of the thermostat has three parts:
- The power supply plug that goes into the wall outlet
- The probe wire
- An outlet for the heat mat. The plug will just go into an outlet to power the temperature control unit.
The probe wire has a suction cup, and whether you're using soilless media indoors or soil as a growing medium inside or outside, you can place the sensor directly into that seedbed. The little suction cup sticks to the 1020 tray and helps keep the sensor from falling out. Remember, the probe goes into the soil, not the water or the bottom of the tray.
Adding a second attachment point will help prevent the probe from falling out of the soil. Do this by taping the wire to the table or using a cable tie and hook to keep the wire in place. If the soil probe falls out, the heat mat can turn itself all the way up and stay that way. This can potentially "cook" your seedlings.

Changing the Settings on Your Thermostat
First, select whether you prefer Celsius or Fahrenheit. For Fahrenheit, just press and hold the up button for three seconds, and it'll switch to ℉. To switch to Celsius, press and hold the down button for 3 seconds.
Next, set the temperature by holding the set button for 3 seconds. Press the up or down arrow to increase or decrease the soil temperature. When you reach the desired temperature, press set.
The heating light turns off and on throughout the day. It goes on when the soil temperature drops below your temperature setting. When the soil has reached the ideal temperature, it turns off.
Seedling heat mats only warm the soil. So, if you go above those germination temperatures in the growing space, such as a greenhouse, it may affect seed germination or your plant's health.

Connecting Several Add-on Heat Mats
Simply line up your heat mats so that the female and male ends meet. There are 3 prongs in each male end. Carefully line these up with the 3 holes in the female end, then plug them in. Plug the master into the wall, then plug in as many as you want to each other.
Using a rack? No problem. Just adjust the height to 21 inches or less so the cords don't stretch.
Bootstrap tip: Avoid connecting more than 4 mats in a chain, as the controllers are designed to run only 4 mats each.

Understanding Electrical Requirements for Heat Mats
Commercial thermostats and heat mats are rated for 1500 watts, which means you can plug in up to 2 sets of 4 chained mats on a 15-amp general household circuit if there are no other draws on the circuit. Double-check your circuit to ensure it's at least 15 amps before you plug it in.
Multiple items on timers and automated controls can easily overload a circuit if your heat mat, dehumidifier, and water pump all happen to click on at the same time.
So let's say you have 20-amp circuits in your house; you don't want to overload them, so eight mats is a comfortable level. You can do 10-12 mats, but if you're going to do 10-12, get three thermostats and divide them evenly for three distinct temperature zones.
Getting the ideal seedling heat mats for your growing space
The best heat mat for your setup is the one that fits your budget and accomplishes what you need it to do.
- For those propagating delicate flowers, having optimal warmth throughout the process from a commercial-grade heat mat with a thermostat is worth the investment. You can avoid ending up with lisianthus that never flowers or zinnias that come out looking like gerbera daisies.
- For the home gardener trying to get a jump on spring planting, a simple heat mat that gives germinating plants in the garage a little extra warmth can be just what you need.
- For market gardeners and those trying to sprout large numbers of cell trays at a time, adding a daisy chain of large seedling heat mats can help you get to market with produce weeks ahead of your competition.